How To Add Your Own Images, Text and Designs
Adding Text, Images and Designs
How To:
Step 1: Click on the Add Image, Add Text or Choose Designs Icons.
Step 2:
To add an Image: Click on or drag your image into the box with the dotted outline.
To add Text: Click on the grey box and start typing. Then click the Add Text Button. To achieve multiple lines of text, hit the enter button and continue typing.
To add a Design: Click on the desired design, the image will automatically be placed inside the ticket template.
NOTE: All Designs and Text must stay inside blue guide lines.
Art Specifications
Logos and images for custom roll tickets can only be printed in black. Logos will be converted into a line art images for printing purposes.
Images uploaded for this product may be no smaller than 250 pixels wide or high and no larger than 1000 pixels wide or high. Images should be in JPG, PNG or GIF file format and with a file size no larger than 2 MB. JPG files created using Adobe Photoshop must be saved using ‘Save for Web.’


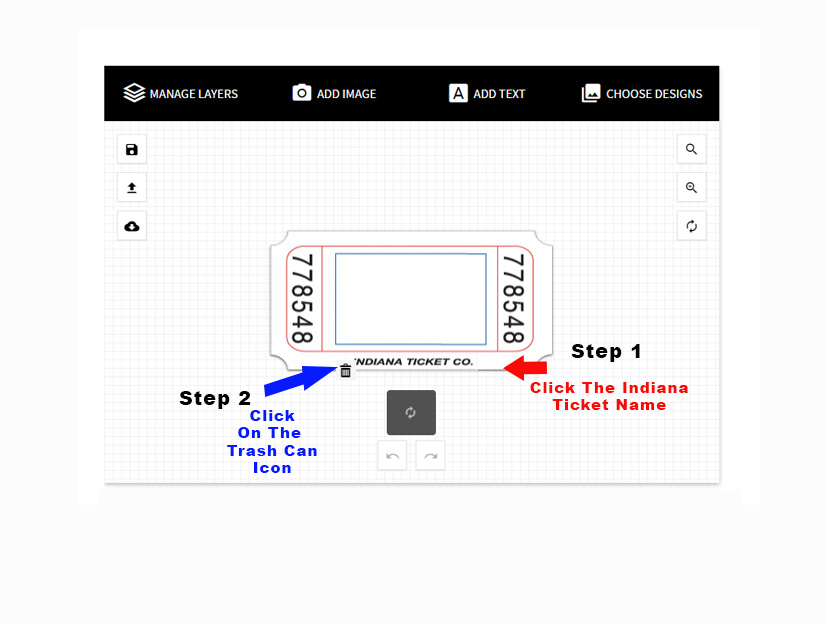
How To Remove The Indiana Ticket Name
How To:
Step 1: Click on the Indiana Ticket Co Name. A trash can icon will appear.
Step 2: Click on the Trash can icon to remove the Name.
How To Style Text
Changing The Font
How To:
Step 1: Click on the text to make the grey pop up menu appear (make the grey menu disappear by clicking anywhere outside of the grey box), click on the Font Named Abril Fatface.
Step 2: Scroll through the available fonts and click on the font style of your choice.
Note: To add several different fonts, add one group of text, and then add another group of text. Now both groups can be styled differently.
Changing The Font Color
How To:
Text for Custom Roll and Billboard Tickets comes in black only.
Changing the font color is available on Wristbands with white backgrounds only.
Wristbands with colored or patterned backgrounds can only have black text. Wristbands with a white backgrounds can have both colored and black text.

How To Style Text
How to change The Font Size
How To:
Step 1: Click on the white box next to the Double T icon. You can either type in the number or use the arrows to change the size up or down (arrows will appear when you hover over the white box).

How To Style Text
How to change the Weight, Italicize or Underline of the font
How To:
Step 1: Make your font bold, italic or underlined by clicking the B,I or U icons in the grey pop up menu (make the grey menu appear by clicking on the design or text, make the grey pop up menu disappear by clicking anywhere outside of the grey box).

How To Style Text
How to change line spacing between several lines of text
How To:
Step 1: Click on the white box next to the three lines and a arrow icon. You can either type the number or use the arrows to change the size up or down (arrows will appear when you hover over the white box).
NOTE: All Designs and Text must stay inside blue guide lines.

How To Align Text
Align Text
How To:
Step 1: Click on the text to make the grey pop up menu appear (make the grey menu disappear by clicking anywhere outside of the grey box), click on the icon with 5 lines.
Step 2: Click on Left, right or center lined icons.
NOTE: All Designs and Text must stay inside blue guide lines.


How To Use Curved Text
Curved Text
How To:
Step 1: If you would like to have curved text, click on the A icon in the grey pop up menu (to make the grey pop up menu appear click on your type, click anywhere outside the menu to make it disappear).
Step 2: Click on the grey area after the circle located in the top left hand corner of the white dropdown menu.
Note: Both the white dropdown menu and the grey pop up menu will disappear, click back on the text and then click back on the A icon to adjust the radius and letter spacing.
Step 3: Move Top grey bar right or left to adjust the radius. Move the bottom grey bar to change the spacing between letters.
NOTE: All Designs and Text must stay inside blue guide lines.


How To Edit Text
Editing Text
How To:
Step 1: Click on the T icon, and start typing in the grey box.
NOTE: All Designs and Text must stay inside blue guide lines.

How To Duplicate Texts and Design
Changing The Font
How To:
Step 1: Click on the text in the grey pop up menu (make the grey menu disappear by clicking anywhere outside of the grey box) click the icon with the two white boxes overlapping located in the upper right hand side.
Step 2: Click on the text or design and move the mouse up or down to separate the duplicated image or text from the original.
NOTE: All Designs and Text must stay inside blue guide lines.

How To Rotate Designs Or Text
Rotating Designs or Text
How To:
There are two ways to rotate, first click on the design or text.
Option 1: Use the editing box that appears around the designs or text. Click and hold down the curved arrow icon located at the top of the editing box. Then move the mouse up or down.
Or
Option 2: Click on the design or text to make the grey pop up menu appear (to make it disappear click anywhere outside the grey pop up menu). Click on the crossed bent lines icon.
Step 3: Move the grey bar right or left to rotate.
NOTE: All Designs and Text must stay inside blue guide lines.

How To Re-Size Designs Or Text
Adjusting the Size of Designs or Text
How To:
Step 1: Click on the design or text.
Step 2: Use the editing box that appears around the designs or text. Click and hold down the double arrow icon located in the bottom right hand corner of the editing box. Then move the mouse up or down.
NOTE: All Designs and Text must stay inside blue guide lines.

How To Adjust The Placement Of Designs Or Text
How To:
Option 1: To move the design or text, click and hold down on the design or text. Then move the mouse right, left, up or down.
Option 2: Click on the square icon, choose right, left, up or down.
NOTE: All Designs and Text must stay inside blue guide lines.

How To Add Color To Your Product
Adding Color To Your Product
How To:
There are two ways to add color to your product.
Option 1: Click on the Manage Layers Button. A pop up menu will appear, inside the pop up menu click on the colored box. Click the box that contains your color choice.
Option 2: Click anywhere inside the ticket or wristband product image. A grey pop up menu will appear. Click the colored box. Click the box that contains your color choice.


How To Add A Patterned Background
Adding A Patterned Background (Wristbands Only)
How To:
Step 1: Add a pattern background by clicking the Choose Designs Button.
Step 2: A pop up menu will appear, select the Pattern of your choice (Hover and Click on the right side of pop up menu to scroll through the different patterns) click on name of the desired pattern.
Step 4: Click on the desired background color to add it and the pattern to the product.


How To Delete The Designs Or Text
Deleting Designs Or Text
How To:
Step 1:To remove your design or text (make sure the editing box is visible, by clicking on the design or text) click on the trash can icon located in the bottom left hand corner of the editing box.

How To Reset To A Blank Product
Resting the Product
How to:
Step 1:To reset your product back to where there is nothing on it, click the reset double curved arrows icon, located on the right hand side of stage
area.
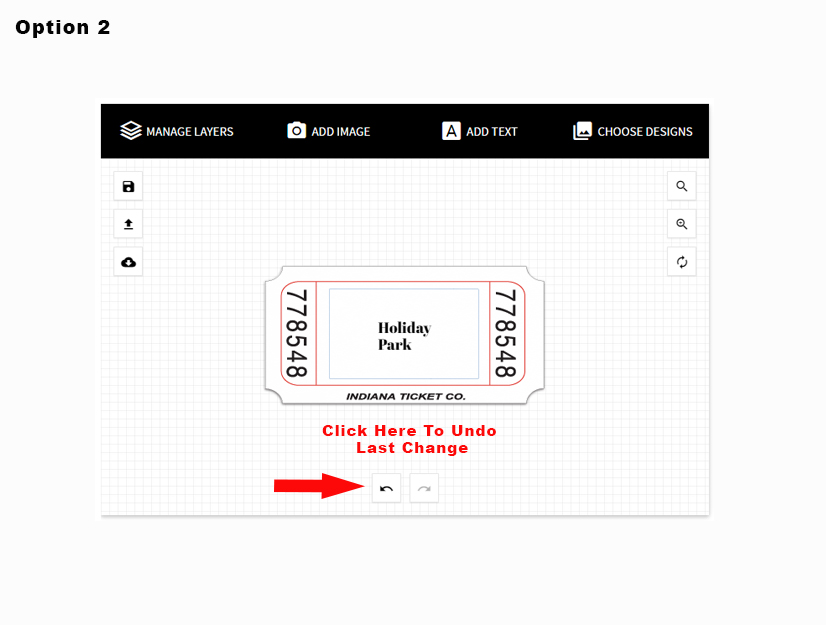
How To Undo Last Change Made
Reset the Design or Text to the last change made
How To:
Option 1: Click the double curved arrow reset icon, the last icon located at the top of the grey pop up menu (click on the design or text to make the grey pop up menu appear).
Option 2: click on the right or left arrow located at the bottom of the stage area.

How To Save, Print Or Download Product Designs
Saving Your Finished Designs
How To:
Step 1: Click on disk icon, located in the left hand corner of the stage.
Step 2: Name your design and click the Save button.
View Saved Product Designs.
How To:
Step 1: Click on the arrow pointing up icon (load), the second icon from the top on the left hand side of the stage.
Step 2: Click on the thumbnail image to view it.
Dowload Your Product Designs
How To:
Step 1: Click on the cloud icon, located at the bottom left hand side the stage.
Step 2: Select what type of file you would like to download, JPG, PNG or PDF.
Download Your Product Designs

How To Order Your Product
Order Your Design
How To:
Once your product has been reviewed.
Step 1: Scroll down and click the add to cart button.
Note: After we receive and process your order you will receive a final proof for approval.
